Introduction
As of 2023, with over 31 million daily active users and 7 million unique broadcasters each month, Twitch remains the premier platform for livestreaming video content. It’s the place where gamers, artists, musicians, and a myriad of other creators share their content with viewers in real time. With numbers like these, the opportunities on Twitch are vast, but so is the competition.
Whether you’re a seasoned content creator looking to switch platforms, or you’re completely new to the world of livestreaming, starting a Twitch channel can seem daunting. But don’t worry, we’ve got you covered. In this comprehensive guide, we’ll walk you through everything you need to know about how to stream on Twitch – from setting up your hardware and software, choosing the right streaming equipment, to promoting your channel and interacting with your viewers.
Are you ready? Great, let’s dive into the fascinating world of Twitch streaming.
Creating a Twitch Account
Taking the first steps into the world of streaming can seem daunting, but it’s actually quite easy to get started. The initial leap you need to make is creating your Twitch account. To set this up, visit Twitch.tv and click on the ‘Sign Up’ button. This will guide you through the process, prompting you to choose a username, password, provide your date of birth and email address.
But hold on, before you jump right into the streaming pool, there’s an essential step we’ve got to address: Two-Factor Authentication (2FA). This little security measure is your account’s own personal bodyguard, and it’s mandatory to start streaming on Twitch.
Before enabling 2FA, you’ll need to verify your email address. Twitch will send a verification email to the address you provided. Once you’ve clicked the link in that email and confirmed everything is in order, you can continue setting up Two-Factor Authentication.
To do this, go into the ‘Settings’ on your Twitch account, find the ‘Security and Privacy‘ tab, and buckle in for the 2FA setup. You’ll need your mobile phone handy, as Twitch will send a unique code to your phone number. Input this code on the website, and voilà, 2FA is set up.
From then on, Twitch will send a new code to your phone each time you log in. It might seem like an extra step, but keeping your account as secure as a bank vault is essential.
Choosing Your Streaming Software
Alright, let’s roll up our sleeves and chat about streaming software. Picture this: you’re at the helm of your own broadcast studio, beaming your unique content straight into the Twitch universe. Sounds pretty cool, right?
There’s quite a variety of streaming software out there, each with unique quirks and perks. Here’s a quick rundown:
- OBS Studio is an open-source powerhouse beloved by many in the streaming community. Free of charge and packed with features like high-resolution streaming and live recording, OBS Studio might initially require a bit of tinkering. Still, it gives you a lot of flexibility.
- XSplit – If you don’t mind investing a bit for a smooth ride, XSplit is worth considering. It’s got a user-friendly interface and is brimming with features. Particularly if you’re into gaming, you’ll appreciate the in-game overlays and a plethora of plugins to tailor your stream.
- Restream – Ever fancied going live on multiple platforms simultaneously? Then, Restream might be your new best friend. It’s straightforward to set up and helps you reach a broader audience by letting you stream across different platforms simultaneously.
- Streamlabs OBS – Combines the best of OBS and Streamlabs, two powerhouses in the streaming industry. It’s user-friendly, free, and has many built-in widgets and themes that make customization a breeze. And the integrated donation processing feature will be a godsend if you plan on receiving donations during your stream.
Twitch Studio will be a good starting point if you’re just now stepping into the streaming scene, and getting started using Twitch Studio is very straightforward. Tailored specifically for streaming novices, it’s user-friendly and offers guided setup, templates, and integrated alerts. And being Twitch’s very own, it’s designed to work in perfect sync with the platform.
Choosing your streaming software is like picking your favorite sandwich at the deli – it’s all about what you fancy. So, take your time to check them out, try them on for size, and see which one suits your style. Remember, the right software can transform your streaming experience, making it more effortless and more enjoyable. Don’t be shy to explore, and here’s to your streaming journey!
Essential Hardware for Streaming on Twitch
Hardware Requirements for Your PC
First things first, your PC. For a smooth streaming experience, you need to ensure your PC meets the minimum requirements. Twitch streaming, especially at higher resolutions, can be demanding on your system, so let’s look at what you’ll need:
For Streaming in 1080p
- CPU: Intel Core i5-4670 or an AMD equivalent.
- GPU: Capable of handling HD video, like the NVIDIA GeForce GTX 960 or an equivalent AMD card.
- RAM: At least 8GB.
For Streaming in 4K
- CPU: More powerful, such as the Intel Core i5-10600K or an AMD equivalent.
- GPU: An NVIDIA GeForce RTX 2060 Super or AMD Radeon RX 5700 or above.
- RAM: 16GB.
Internet Connection
For optimal streaming quality, it is crucial to have a stable and high-speed internet connection. Twitch provides specific recommendations based on different streaming resolutions. Here are the suggested upload speeds:
- 720p video: 3-6 Mbps
- 1080p video: 6-13 Mbps
- 2K/4K video: 13-60 Mbps
You can utilize an online speed test to determine your current internet speeds. This will help you assess whether your connection meets the requirements for smooth streaming.
Storage
Lastly, make sure you have plenty of storage. Streaming and recording can take up significant space over time. A solid-state drive (SSD) can offer faster data access times, leading to smoother streaming.
As your streaming career evolves, you may need to upgrade your setup for even better quality and performance. But this setup should help you hit the ground running in the Twitch streaming world.
Webcams

When you’re streaming, your viewers will want to see your reactions, triumphs, and frustrations. This is where a good webcam comes into play. Here are some excellent options for you to consider:
- Dell UltraSharp WB7022: offers a wide field of view and 4K resolution. This webcam is perfect for streamers who want the highest quality video.
- Logitech Brio Webcam: This popular choice provides excellent 4K video quality and a high frame rate, perfect for keeping your stream smooth and professional.
- Razer Kiyo Pro: The Razer Kiyo Pro is an excellent choice for streamers, with an adjustable ring light and 1080p video quality.
- Logitech C922 Pro Stream Webcam: Another strong contender, offering 1080p resolution and a built-in stereo microphone.
- Elgato Facecam: A webcam specifically designed for streamers, with excellent video quality and software for fine-tuning your image.
Microphones

Your voice needs to be clear and audible over the game’s sound. This is why a good microphone is essential for your stream. Here are some options to consider:
- Shure SM7B: A professional-grade microphone used in radio studios worldwide. Known for its smooth, warm sound.
- RØDE NT-USB Mini: A compact, studio-quality USB microphone perfect for streaming and recording.
- Razer Seiren V2 Pro: Designed for streamers, this microphone offers high-quality audio and a sleek design.
- Elgato Wave 3: A microphone with incredible audio quality and built-in mixing capabilities.
- Blue Yeti: A popular and versatile USB microphone with various pickup patterns suitable for different recording situations.
Each of these webcams and microphones has unique features and benefits. Your choice will depend on your budget, your streaming setup, and the level of quality you want for your streams.
Additional Equipment
The basic requirements we’ve discussed are essential to get you up and running. However, as you progress on your streaming journey, you may want to consider a few more pieces of equipment to enhance the quality of your stream and engage your audience in unique ways.
Capture Card: A key player, especially for console gamers. This gadget works like magic, capturing the video signal from your PC or console, translating it, and then sending it to your PC for broadcasting on Twitch. It makes the console-to-PC-to-Twitch process a seamless journey. Also, the quality of your stream won’t take a hit, ensuring your gaming content looks as crisp as it should.
Green Screen: Now, this one’s pretty cool. Want to swap your real-life, cluttered background with a scenic view of a beach, space, or even a live feed of the game you’re playing? A green screen is what you need! It allows you to overlay any background you wish behind you, adding a touch of professionalism and fun to your stream.
Lighting: You could be streaming with the best webcam out there, but without good lighting, the picture quality won’t be as clear or flattering. A basic lighting setup can significantly improve your look on camera, accentuating your features and eliminating harsh shadows. It’s all about looking your best on camera, and good lighting can do wonders!
Stream Deck: Imagine a professional streaming studio right at your fingertips. Well, that’s a Stream Deck for you! It’s a customizable control center that enables you to execute various commands without missing a beat. Want to switch scenes? Launch media? Adjust audio? A simple button press on the Stream Deck, and you’re done. It takes multitasking to a whole new level, making your streaming life much easier and more efficient.
These pieces of equipment add layers of professionalism to your streaming setup. As you continue to grow your channel, investing in these tools can help ensure your stream is the best it can be, setting you apart from other content creators in the vast universe of Twitch.
How to Stream on Twitch from Your Desktop Computer
Let’s dive in and explore how you can start streaming on Twitch from your PC. If you feel overwhelmed, don’t worry, we will walk through it step by step.
Step 1: Download and Install a Streaming Software
The first step to start streaming on Twitch is to download and install streaming software. As we’ve previously covered, you have various options like OBS Studio, XSplit, and Twitch Studio. For beginners, Twitch Studio provides an excellent, user-friendly experience. If you want a bit more freedom and customization options, OBS Studio and XSplit might be more up your alley.
Once you’ve selected the software that best suits your needs, you’ll need to download it from the respective website and follow the installation instructions. This process is typically straightforward, but if you encounter any issues, check the software’s support or FAQ sections for help.
Step 2: Set Up Your Stream
Once your software is up and running, it’s time to dive into the meaty part of setting up your stream. Here’s a breakdown of each segment:
Video and Audio Settings
To begin, prioritizing your video and audio settings is crucial. Twitch’s Broadcasting Guidelines offer excellent recommendations for vital elements like bitrate, framerate, and resolution. However, your best settings will depend on your equipment and internet capabilities. Discovering your ideal settings may require some experimentation.
- Navigate to your streaming software’s settings or preferences.
- Locate the video or output section. Here you’ll typically find options to set your video resolution and frame rate. As a standard for beginners, 720p at 30 frames per second (fps) provides a good balance between quality and performance. However, if your PC and internet connection are capable, you might opt for 1080p at 60fps for a higher-quality stream.
- Navigate to the audio section of the settings. Here, you can choose your audio devices (microphone and speakers) and set the audio bitrate. A bitrate of 160kbps is sufficient for a clear and good-quality audio stream.
Remember, high-resolution video and high-quality audio demand more computing power and internet bandwidth. Make sure your settings align with what your hardware and internet connection can handle.
Scenes and Overlays
Next, let’s make your stream visually engaging. Setting up different scenes and overlays can give your stream that ‘personal touch.’ To do this:
- Look for the scenes or sources section in your software.
- Start creating your scenes. Each scene could represent a different part of your stream – perhaps one for gameplay, one for chatting, and one for those quick “be right back” moments.
- Once your scenes are set, add sources to each scene. Sources can include game capture, window capture, browser, webcam, image, text, and more.
- Now, onto overlays! Overlays can be added as image sources on top of your existing sources and can include webcam borders, on-screen alerts, stream information, and more. There’s a wealth of free and paid overlays available online, so find one that matches your style.
Always preview your scenes and sources before going live to make sure everything looks as expected!
Webcam and Microphone
Last but certainly not least, it’s time to add your webcam and microphone so your audience can see and hear you. To set these up:
- In your scene, add a new source and select video capture device for your webcam.
- Adjust the size and position of your webcam feed on your stream.
- For audio, ensure that your chosen microphone is selected in the audio settings of your streaming software.
- Do a few test recordings to make sure your audio is clear and at an appropriate volume. Too soft and viewers won’t be able to hear you, too loud and the audio may become distorted.
Take the time to get comfortable with these settings. With everything set up to your liking, you’ll be streaming like a pro in no time.
Step 3: Connect Your Twitch Account
Next, you’ll need to connect your streaming software to your Twitch account. This process may vary slightly depending on your software, but generally, it involves logging into your Twitch account through the software and authorizing it to broadcast to your Twitch channel.
After successful authorization, a ‘stream key‘ is generated. This unique key allows your software to stream to your Twitch channel. Handle this key with care! Anyone with your stream key can stream to your channel.
Step 4: Start Streaming
Now that you’ve got everything set up, it’s time to go live! Press the ‘Start Streaming’ or ‘Go Live’ button in your software, and you’re now broadcasting to the world via Twitch! When you’re finished with your stream, remember to press ‘Stop Streaming’ or ‘End Stream’ in your software to conclude your broadcast.
How to Stream on Twitch with Consoles
Jumping into Twitch streaming doesn’t necessarily require a high-powered PC. In fact, consoles like the PlayStation 4, Xbox One, and their successors offer built-in streaming capabilities, making it a breeze to broadcast your gameplay directly to Twitch. Let’s explore how to set up and stream from your favorite console.

How to Stream on Twitch with PS4
Looking to share your PlayStation 4 gaming exploits with the world? Well, you’ve certainly picked the right platform. PlayStation 4 comes equipped with native live-streaming capabilities, letting you kickstart your live broadcasting journey straight from your console. Let’s delve into how you can get this up and running:
Setting up your PS4 for Live Streaming
- Disable HDCP: HDCP (High-bandwidth Digital Content Protection) prevents the copying of digital audio and video content across connections. However, it can interfere with streaming, so we need to disable it. To do this, go to Settings -> System, find ‘Enable HDCP‘ and uncheck the box.
- Enable sharing: Your first step is to make sure sharing is turned on for your console. To do this, navigate to Settings -> Sharing and Broadcastsand ensure the ‘Share Gameplay’ box is checked.
- Adjust video and audio settings: Still within the ‘Sharing and Broadcasts’ menu, you’ll find options for tweaking the quality of your video and audio. Your internet connection will dictate whether you should opt for higher or lower settings for your broadcast quality.
- Set Up Your Microphone and Camera: For your viewers to hear and interact with you during your gameplay, you’ll need to adjust your microphone settings. You can find these under Sharing and Broadcasts -> Audio Sharing Settings. Make sure the ‘Include Microphone Audio in Broadcasts’ box is checked. For the camera, if you have a PlayStation Camera, you can set it up by navigating to Settings -> Devices -> PlayStation Camera. Make sure the box for ‘Include Video from PlayStation Camera in Broadcast‘ is checked.
- Enable chat: Finally, to facilitate interaction during your stream, you’ll want to enable chat. You can activate this feature in Sharing and Broadcasts -> Broadcast Settings -> Advanced Settings. Check the box that says ‘Display Message to Spectators and Spectators’ Comments.‘ This will enable viewers to engage in chat while you’re streaming.
Connecting your PS4 to Twitch
Now, with your PS4 ready to share your epic gaming moments, it’s time to link it up with your Twitch account.
- Begin the broadcast: Press the ‘Share‘ button on your PS4 controller, then select ‘Broadcast Gameplay.‘ You’ll see a few different service options, so select Twitch.
- Link your Twitch account: If this is your first time broadcasting on Twitch from your PS4, you’ll need to visit Twitch.tv/activate on a separate device and enter the code displayed on your PS4 screen. This will link your Twitch and PS4 accounts.
- Configure your stream: Finally, you’ll need to configure your stream. This includes setting the stream’s title, deciding whether to include party audio, and adjusting any other settings to suit your preferences.
Voila! Your PS4 is now ready for streaming. Of course, if you’re looking for a deeper dive into the world of PS4 streaming, you can find more comprehensive information here.

How to Stream on Twitch with Xbox
Xbox One, with its robust and user-friendly interface, makes streaming to Twitch a straightforward process. Here are the steps you need to follow:
1. Check Your Updates and Settings
First, make sure your Xbox is updated to the most recent version by navigating to ‘Settings -> System -> Updates.‘ Additionally, check your account settings to ensure there are no parental controls or restrictions that might interfere with your streaming, particularly in ‘Privacy and Online settings.‘
2. Start Your Live Stream Setup.
Press the Xbox controller’s home button, navigate to the ‘Capture and Share’ tab, and select ‘Live Streaming.’
3. Link Your Twitch Account
Go to Twitch.tv/activate on your computer or mobile device, input the code provided on your Xbox screen, and click ‘Activate.’ This will link your Twitch and Xbox accounts.
4. Customize Your Stream Settings.
This is where you’ll set up your stream title, camera, and microphone. You can also decide if you want your party chat audio included in the stream. Additionally, you can adjust your stream resolution and bitrate according to your preferences and your system’s capabilities.
- Set Up Your Microphone: For your viewers to hear you, go to ‘Settings -> General -> Volume & audio output’ and select the ‘Headset’ option.
- Set Up Your Camera: To include your video, navigate to ‘Settings -> Preferences -> Xbox app connectivity’ and select ‘Allow game streaming to other devices.’
5. Start Broadcasting.
Once your settings are to your liking, hit the ‘Go Live’ button. Your Xbox menu will be displayed until you launch a game, and your gameplay will then be live on your Twitch channel. Chat messages won’t appear on the TV screen, so consider having a second device handy to read and respond to chat.
6. Ending Your Stream.
When you’re ready to end your stream, press the home button, navigate to the ‘Live Streaming’ tab, and choose ‘Stop live stream.’

How to Stream on Twitch from your Phone
Streaming from a smartphone may seem a bit unconventional, but it’s perfectly feasible and convenient for IRL (In Real Life) streams. Here’s how to get started:
1. Install the Twitch App
If you haven’t already, download the Twitch app from the App Store or Google Play Store and sign into your account.
2. Allow Necessary Permissions
When you first open the Twitch app, it will ask for necessary permissions, including access to your camera, microphone, and your device’s storage. Make sure to allow these so you can stream smoothly.
3. Navigate to Your Stream Dashboard
Tap your profile icon in the top left corner of the screen to open the menu. From there, select the ‘Go Live’ option. This will take you to your Stream Dashboard.
4. Set Up Your Stream
You can add a title for your stream, select the category, and set up your stream’s chat settings from the dashboard.
5. Start Streaming
When you’re ready to go live, press the ‘Start Stream’ button. Your stream will start, and you’ll be broadcasting live to your Twitch audience.
Remember, streaming over a cellular data connection can consume a significant amount of data. Enjoy your mobile streaming adventures!

How to Stream on Twitch from your Switch
Before we dive into the steps, let’s ensure you have everything you need to start:
- A Nintendo Switch Console with a docking station.
- A reliable capture card – Elgato HD60 S or AVerMedia Live Gamer Portable 2 are excellent options.
- A PC or laptop.
- Broadcasting software like OBS or XSplit.
- HDMI cables to connect your devices.
- (Optional) A webcam and a microphone if you wish to stream your face and voice alongside the gameplay.
For the purposes of this guide, we’ll be using the Elgato HD60 S capture card. Its compatibility with Nintendo Switch and user-friendly interface make it a popular choice among streamers. Now, let’s dive into the process.
1. Set Up Your Devices
Connect the HDMI cable from your Switch dock to the ‘HDMI In’ port of the capture card. Then, plug the USB of the capture card into your computer. This way, the capture card will send the video footage to your computer. If you’re using a TV for gaming, add an additional HDMI cable that connects from the ‘HDMI Out’ port of the capture card to your TV.
2. Configure Your Software
Open the Elgato Game Capture HD software. This software should automatically recognize your device and capture your Switch gameplay. Adjust the software settings for optimal resolution, audio input, and picture/audio profiles.
3. Set Up Your Broadcast
In your broadcasting software (OBS or XSplit), create a new scene and add a source. Use the ‘window capture’ or ‘video capture device’ options to pull in the gameplay from the capture card. If you’re using a webcam, add it as a ‘video capture device’ source and arrange it on your screen as desired.
4. Go Live
Log in to your Twitch account within your broadcasting software’s settings. Click ‘Go Live’ to start your live stream. Your Nintendo Switch gameplay should now be live on Twitch. Engage with your chat, and remember to enjoy the experience! If you’re gaming on a TV, follow the same steps to set up your webcam and initiate the stream on Twitch, selecting the capture card directly to capture the footage.
Deciding What to Stream on Twitch
With your Twitch account ready and your streaming equipment at hand, the big question remains – what should you stream? The vast universe of Twitch content is invitingly broad, so let’s start exploring.
Find a Content Category
For many, the journey begins in the vibrant gaming landscape of Twitch. Here you can find everything from action-packed first-person shooters to intricate strategy games, MMOs, and even serene life simulators. A captivating game can draw an audience, while your unique gameplay and reactions can turn viewers into loyal fans. If you’re a gaming enthusiast, think about exploring popular games that consistently garner views on Twitch.
But if gaming doesn’t strike a chord, Twitch offers a colorful palette of non-gaming content that could align perfectly with your interests. Some examples include:
- Just Chatting: This space lets streamers converse on virtually any topic—daily life experiences, personal anecdotes, or current event discussions, to name a few.
- IRL (In Real Life): In this genre, streamers share real-time snippets of their everyday lives, from cooking a meal to painting or simply going for a walk.
- Music: An ideal stage for musicians to perform live concerts, share their songwriting journeys, or organize jam sessions.
- Arts: Visual artists use this to live-stream their creative process, be it painting, digital art, or sculpting.
- Talk Shows & Podcasts: Here, streamers host live chats on a variety of topics, which can range from interviews to panel discussions or regular podcast episodes.
- Fitness & Health: This category encompasses everything from workout routines and yoga classes to wellness discussions and healthy cooking demos.
How to Find your streaming Passion
Perhaps you’re still searching for that passion, that spark to light your streaming journey. In that case, here are some strategies to find the ideal content for your stream:
- Identify Your Interests: Start by pinpointing what truly captivates you, whether it’s a particular video game, art and craft, talk shows, or something completely different.
- Consider Your Skills: What are your talents? Streaming is an excellent platform to showcase what you’re good at, be it gaming, cooking, storytelling, or anything else.
- Explore Different Genres: Don’t confine yourself to a single category. Twitch offers a diverse range of categories beyond gaming—music, cooking, chatting, and many others are waiting to be discovered.
- Test Out Different Ideas: Try streaming various types of content and gauge what feels most natural and enjoyable. Experimentation is key in discovering your passion.
- Think Long Term: Choose something you’re likely to remain passionate about months or even years down the line. Consistency is key in streaming, and it’s easier to maintain if you love what you’re doing.
- Consider the Market: While passion is crucial, it’s also worthwhile to think about what niches may be underrepresented on Twitch. This could open an opportunity to merge something you love with something that’s in high demand.
- Trust Your Gut: Ultimately, your intuition is the best guide in finding your passion. Trust your instincts when deciding what to stream.
Your streaming journey should reflect your interests, your passions, and your personality. After all, the most engaging streamers are those who genuinely enjoy what they do. Happy streaming!
Tips and Tricks for Live Streaming on Twitch
Congratulations! You now have the technical aspects of streaming on Twitch down. But creating a successful stream involves much more than just going live. Here are a few tips and tricks to help you develop a stream that stands out and engages your audience.
Make Your Stream Look Good
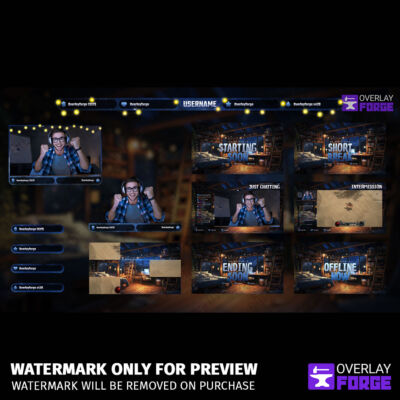
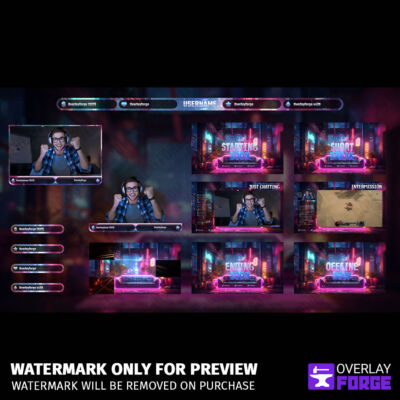
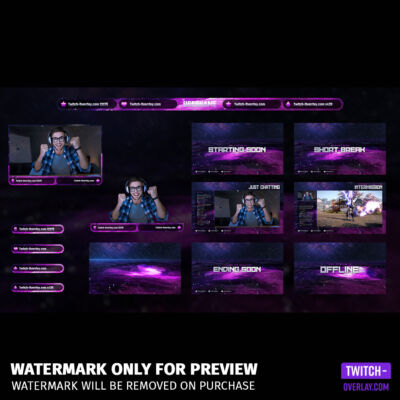
When viewers hop onto your stream, the first thing they notice is how it looks. Creating a visually appealing and consistent theme for your stream is vital. One effective way to do this is through the use of stream overlays.
Stream overlays are graphic frames or borders around your broadcast’s edges. They can display various information, such as your social media handles, recent followers, subscriber counts, etc. Overlays can also be interactive, triggering animations when viewers follow, subscribe, or donate.
Stream screens add another level of professionalism to your stream. For instance, ‘Be Right Back’ (BRB), Pause, Intermission, and End screens allow you to communicate with your audience even when you’re not directly in front of the camera.
- BRB Screens: Useful for when you need to take a short break but don’t want to end the stream.
- Pause and Intermission Screens: Great for when you’re transitioning between games or segments of your stream.
- End Screens: Helpful in signaling that your stream is ending and where viewers can catch you next.
Twitch alerts are another fantastic way to acknowledge your viewers. These pop-up notifications appear during your stream when someone follows you, subscribes, donates, or takes another significant action. They’re a fun way to engage with your audience and encourage more interaction.
Twitch banners, on the other hand, can be used to brand your channel and give viewers an idea of what to expect from your stream.
There’s no one-size-fits-all approach when it comes to stream design. Tailor yours to reflect your personality and the type of content you’re creating. It’s worth investing time and money to ensure your channel looks professional and unique.


Streamer Etiquette and Unspoken Rules
Your behavior towards viewers can influence your Twitch channel’s success. Follow these principles to foster a positive streaming environment:
- Respect Twitch’s Community Guidelines. Adherence to Twitch’s Community Guidelines ensures a safe, inclusive space. Violations can lead to penalties, including channel suspension.
- Engage with Your Audience. Acknowledge your viewers by responding to their comments and questions. This engagement shows them you value their time and support.
- Promote Positive Interaction. Encourage respectful conversations in your chat. While disagreements are inevitable, maintaining respectful discourse is key.
- Appreciate Your Supporters. Express gratitude towards your supporters, whether they donate, subscribe, or regularly view your streams. A simple thank you can make your community feel appreciated.
- Don’t Tolerate Harassment or Toxic Behavior. Actively moderate your chat to prevent bullying and toxicity. Issuing warnings or banning users when necessary helps maintain a healthy chat environment.
- Be Transparent. Honesty builds trust. Disclose any sponsorships or promotions, and communicate promptly about any changes.
- Stick to Your Schedule. Consistency is key. Keeping to your streaming schedule lets your viewers know when they can expect to tune in for your broadcasts.
Upgrade your Streaming Setup
As you stride further on your Twitch journey, encounter some technical hurdles like stream lag or a drop in frame rates. Often, these are signs that your system is stretching its resources too thin, trying to game and stream simultaneously.
One efficient solution can be upgrading your current PC’s hardware—a more powerful processor, additional RAM, or a stronger graphics card. These enhancements can breathe new life into your stream’s performance.
However, if you’re looking for more professional alternatives, consider the possibility of a dedicated streaming PC or the use of a capture card. The former is a separate computer designed to handle only the stream’s encoding and broadcasting, ensuring your main PC runs your games without a hitch.
Capture cards, on the other hand, offer an elegant, standalone solution for those not ready to commit to a second PC. They bridge your current PC and your audience on Twitch, capturing, encoding, and transferring the gameplay directly to the platform, thus lifting some load off your PC.
Play Streamer Music
A silent stream can be disconcerting, even off-putting, for viewers. Adding music can create a warm, inviting ambiance that enhances the overall mood of your stream. However, it’s crucial to remember the importance of copyright laws when selecting your tunes. Ensure you’re using royalty-free music or music you have express permission to play. This approach respects musicians’ rights and keeps your stream in good standing. You can source suitable soundtracks from services such as Pretzel Rocks and StreamBeats. They offer extensive libraries of royalty-free music explicitly tailored for streamers.
Promote Your Channel
It’s not enough to just create great content. You also have to get it in front of viewers. You can start by promoting your Twitch channel on other platforms.
- Leverage Social Media: Use platforms like Twitter, Instagram, and Facebook to announce when you’re going live and to share highlights from past streams.
- Collaborate with Other Streamers: Engage with other streamers on Twitch. You can host each other’s streams, collaborate on streams, or engage in Twitch Raids.
- Engage in Twitch Communities: Join Twitch communities related to your streaming content. Be an active participant, not just someone who promotes their own content.
Try to promote your stream during non-streaming hours as well. Post highlights, schedules, or other relevant content to engage your audience even when you’re not live. By building and engaging with your community, you’re more likely to see steady growth on your channel.
Keep Learning and Improving
Streaming is a journey. Don’t be discouraged if you don’t get it all right the first time. Continue to learn, improve, and experiment with new ideas. Keep up-to-date with Twitch’s latest features and community trends. Your perseverance will pay off.
FAQs
What do I need to Start Streaming?
To start streaming, you need a Twitch account, broadcasting software, a stable internet connection, and a device to stream from. This could be a PC, console, or even a phone. You’ll also need a game to play if you’re streaming gameplay.
How Old do you have to be to Stream on Twitch?
To stream on Twitch, you must be at least 13 years old. If you’re between 13 and 18, you should review the site’s Terms of Service and Safety Guidelines with a parent or guardian to fully understand them.
Is it free to stream on Twitch?
Yes, it is free to stream on Twitch. While there are optional premium services such as channel subscriptions and Twitch Turbo, streaming does not require payment.
Do you need 2 PC to stream?
Having two PCs for streaming—one for gaming and one for broadcasting—is not required, but it can improve the quality of your stream. The second PC encodes and broadcasts the stream, freeing up resources on the gaming PC.
What are the minimum requirements to stream on Twitch?
You should have a stable internet connection with at least 3-6 Mbps upload speed. As for your computer, it should have at least an Intel Core i5-4670 processor (or its AMD equivalent), 8GB of RAM, and a graphics card that’s capable of supporting hardware encoding, such as the NVIDIA GeForce GTX 1660 or the AMD Radeon RX 580. Please note that these requirements can vary based on the quality of your stream and the type of content you intend to broadcast.
What do gamers use to stream?
Gamers typically use broadcasting software (like OBS or XSplit), a PC or console, a good quality microphone and webcam, and a stable internet connection to stream.
Where do I find my Twitch Stream Key?
To find your Twitch stream key, you’ll need to navigate through your account settings, specifically within the “Stream Settings” The stream key is located in the “Stream Key & Preferences” section. However, remember to treat your stream key as confidential, as it provides access to stream to your Twitch channel.
Is it better to stream on console or PC?
Whether it’s better to stream on a console or PC depends on your preference and the content you plan to stream. Consoles are often more user-friendly, while PCs offer more customization and control over the streaming experience.
How much does Twitch pay?
Twitch does not pay streamers directly for streaming. Streamers make money through viewer donations, channel subscriptions, ad revenue, and participation in the Twitch Partner program.
- Beginner Streamer: Initial earnings are often minimal, with income primarily from viewer donations.
- Affiliate Streamer: Streamers can start earning through subscriptions and Bits upon reaching Twitch Affiliate status. Earning you up to a few hundred monthly dollars with an engaged audience.
- Partner Streamer: Twitch Partners have more monetization options and may earn several thousand dollars per month, depending on audience size and engagement.
Wrapping it up
Live streaming on Twitch is a journey of constant learning, engagement, and improvement. Whether you’re streaming from a PC, console, or mobile device, understanding the technical setup is only the first step. From there, it’s about creating engaging content, building a community, and promoting your channel effectively.
Keep in mind the importance of aesthetics in capturing viewers’ attention. Custom stream overlays, screens, alerts, and banners can go a long way in defining your brand and making your streams more appealing.
Most importantly, remember to uphold the highest standards of streamer etiquette. Respectful and interactive engagement with your viewers forms the bedrock of a thriving Twitch community. Be transparent, set a consistent streaming schedule, and maintain a positive chat environment to foster a loyal and active viewership.
Success on Twitch doesn’t happen overnight. It takes time, dedication, and passion. But with the right tools, knowledge, and mindset, you’re well-equipped to embark on this exciting journey. Happy streaming