Once upon a time, in a land where Twitch and Discord dominated the streaming and gaming realms, there was a streamer who wished to unite these two powerful platforms. It was no easy task, but the streamer embarked on a journey to discover the secrets of linking Twitch to Discord. And so, this tale begins…
Creating a Discord Server for Your Streaming Community
Crafting a cozy haven for your streaming community is essential for fostering connection and camaraderie among your viewers. Here’s a quick guide on how to create a Discord server and some valuable tools to enhance your server’s functionality.
How to Create a Discord Server:
- Laying the foundation: Open the Discord app or visit discord.com. If you don’t have an account, sign up for one.
- Raising the walls: Click the “+” icon on the left sidebar, and choose “Create a Server.”
- Naming your kingdom: Enter a server name and select a region. You can also upload a server icon to make your server more recognizable.
- Invite your subjects: Share the invite link with your Twitch viewers and other community members to build your server’s population.
Useful Tools for Your Discord Server:
- Bots: Enlist the help of various bots, like MEE6, Dyno, or Nightbot, to automate moderation, greet new members, and play music. Bots can also help you create custom commands and run giveaways.
- Webhooks: Use webhooks to integrate third-party applications like Twitter or YouTube, ensuring your community stays up-to-date with your latest content.
- Roles and Permissions: Set up custom roles for different members (e.g., subscribers, moderators) and define their permissions within the server. This helps maintain order and provides exclusive access to specific channels or features.
- Voice and Text Channels: Organize your server with various voice and text channels dedicated to different topics or activities, such as game-specific discussions, off-topic chat, or even a channel for sharing memes.
With your new Discord server and these handy tools, you’re well on your way to creating a vibrant, engaging space for your streaming community to thrive.
Why Should You Connect Twitch to Discord? – The Benefits of a United Kingdom
- Fostering a community: Connecting Twitch to Discord helps to create a hub for your viewers to interact with you and each other, building a stronger community.
- Exclusive access: Grant special Discord roles and access to subscriber-only channels for your Twitch subscribers, adding value to their subscriptions.
- Accessible communication: Share updates, schedule streams, and interact with your viewers in a more organized and efficient manner.
How to Connect Your Twitch to Discord: A Step-by-Step Guide
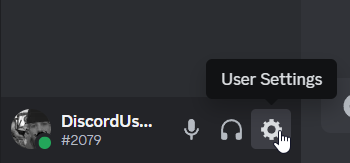
Step 1: Forge an alliance: Open the Discord app, and click the gear icon ⚙️ next to your username in the lower-left corner to open User Settings.
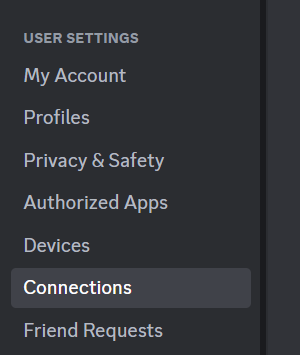
Step 2: Creating connections: Find the Connections tab in the User Setting.
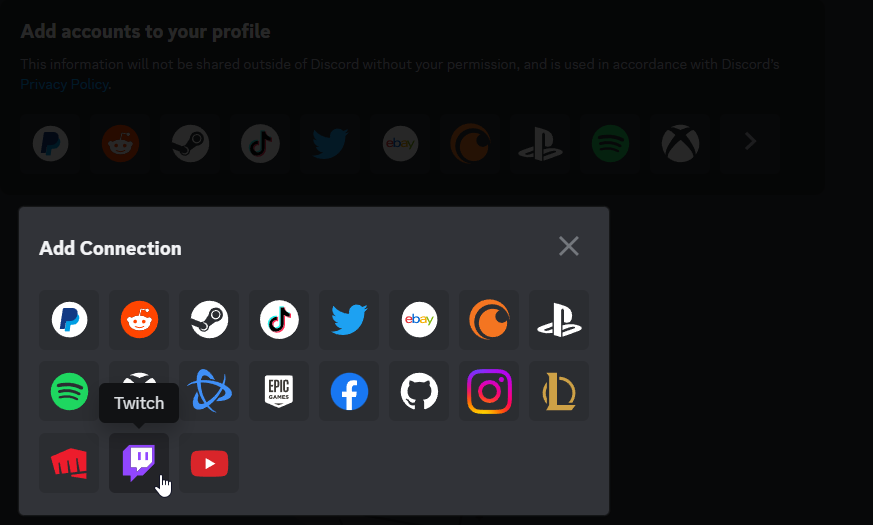
Step 3: A meeting of platforms: In the Connections tab, you will find the Twitch icon. Click it to connect your Twitch account to Discord.
Step 4: The bond is formed: A new window will open. Sign in to your Twitch account and authorize Discord to access it.
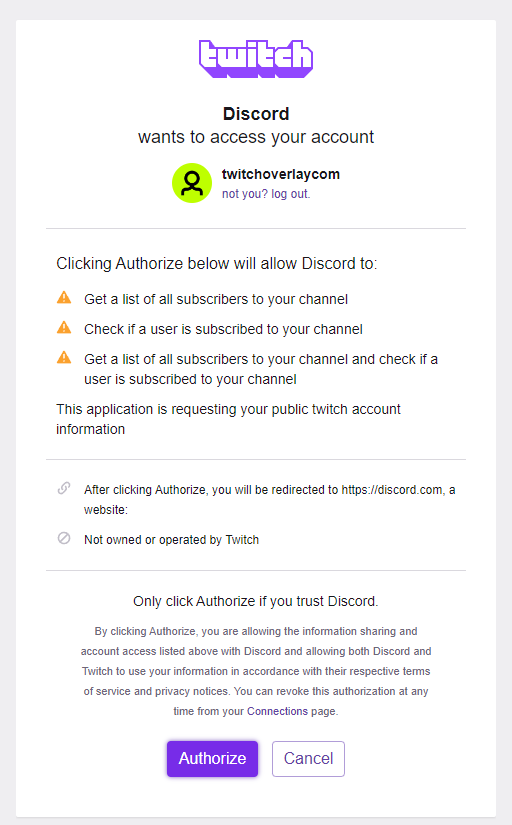
Step 5: The union is complete: Your Twitch account will appear in the Connections tab once connected. You can now manage your Twitch integration within Discord.

How to Set Up Twitch Subscriber Roles in Discord – The Royal Court
As a Twitch Affiliate or Partner, you can show appreciation for your subscribers by offering them exclusive benefits on your Discord server. For example, by creating subscriber roles, you can grant subscribers special privileges, like access to exclusive channels, a unique role color, or even priority in voice chats. Let’s dive into the steps to set up these royal roles for your valued subscribers.
- Create a Role: Within your Discord server, locate the down arrow beside the server’s name and select “Server Settings.” Make your way to the “Roles” tab, hit the “+” button, and forge a new role specifically for your Twitch subscribers.
- Customize permissions: Configure the new role’s permissions according to your preferences. You can grant access to exclusive channels, allow posting images or links, and more.
- Integrate the platforms: Go to your server settings’ “Integrations” tab. Click “Connect” next to the Twitch icon. Note that you must be a Twitch Affiliate or Partner to access this integration.
- Sync the roles: After connecting your Twitch account, you will see a list of available subscriber roles. Choose the role you created earlier and click “Sync” to automatically assign it to your Twitch subscribers.
How to Add Discord Bots to Your Server – Enlisting Magical Helpers
Discord bots can provide various features and tools to enhance your server’s functionality, especially for streamers. For example, bots like MEE6, Nightbot, and Streamcord can help you manage your Twitch integration, send notifications when you go live, and offer other streaming-related features. Here’s how you can add these magical helpers to your server:
- Choose a bot: Browse various Discord bot websites or the Discord Bot List, and select a bot that meets your needs. Consider bots like MEE6, Nightbot, or Streamcord, which offer Twitch-related features.
- Invite the bot: Click the “Invite” or “Add to Discord” button on the bot’s page. You’ll be asked to choose a server and authorize the bot.
- Configure the bot: Follow the setup guide or use its commands to customize its behavior and features to your liking. Configure the bot to assist with Twitch-related tasks, such as posting notifications when you go live or offering custom chat commands for your viewers.
What is Streamer Mode and How to Turn It On in Discord – The Cloak of Invisibility
Streamer Mode is a feature in Discord that automatically hides personal information and mutes notifications when you’re live on Twitch, protecting your privacy and preventing interruptions.
To activate Streamer Mode:
- Open Discord and click the gear icon ⚙️ next to your username to access User Settings.
- Navigate to the “Streamer Mode” tab.
- Enable “Automatically Enable/Disable” to have Discord automatically detect when you’re streaming and activate Streamer Mode.
A Grand Finale – The Future of Your Streaming Kingdom
In this ever-evolving world of Twitch and Discord, streamers like yourself can harness the power of these two formidable platforms to create a unique and captivating experience for all who venture into your realm. Through this enchanting tale, you have unlocked the long-hidden secrets of connecting your Twitch account to Discord, establishing regal roles for your loyal subscribers, summoning magical bots to aid in your server’s management, and so much more.
Bear in mind that the journey is far from over. As you continue to expand your streaming dominion, embrace the spirit of exploration and innovation. Dive deeper into the vast sea of possibilities, experiment with diverse bots and integrations, and pay heed to the desires of your cherished viewers. By doing so, you’ll forge a vibrant and welcoming haven where your community can flourish, ultimately leading to a more delightful and gratifying streaming experience for all who dwell within your kingdom.
May your streams forever prosper and your Discord thrive!
Frequently Asked Questions
Ensure that your streaming software is configured to capture your Discord audio. Check the audio settings within your streaming software, and make
sure that the correct audio source is selected.
While having a Discord server is not a requirement for Twitch streamers, it is highly beneficial. A Discord server allows streamers to build a stronger, more engaged community by providing a space for viewers to interact with each other and the streamer. It also helps with sharing updates, promoting content, organizing events, and offering exclusive perks to subscribers. Overall, a Discord server can significantly enhance the streaming experience for both the streamer and their viewers.
To create an invite link for your Discord server, follow these simple steps:
- Navigate to your Discord server.
- Locate the channel list on the left side, and right-click on the channel you’d like new members to land in upon joining.
- Select “Invite People” from the context menu.
- A window will appear with an invite link. You can customize the link’s expiration and maximum use by clicking “Edit Invite Link.”
- Click “Copy” to copy the link to your clipboard, and share it with others to invite them to your server.
Remember to be cautious when sharing your Discord link, as anyone with access to the link can join your server.


