As a Twitch streamer, you’ve probably already discovered the importance of donations for sustaining and growing your channel. Donations provide financial support and serve as a valuable form of encouragement and validation for your hard work. They show that your viewers appreciate and want to see more of your content.
This article will explore how to set up donations on Twitch for affiliates and non-affiliates and different options for receiving donations with PayPal and alternative payment methods, including step-by-step guides and tips & tricks.
We’ll also discuss enhancing your Twitch stream with better setups and viewer engagement strategies to increase the chances of receiving more donations. And now, let’s get started and learn how to utilize donations to take your Twitch career one step closer to Streaming for a living!
Setting Up Donations as a Twitch Affiliate or Partner
Twitch Affiliate status is a significant milestone for any streamer. It unlocks additional features and monetization options, one of which is the ability to receive donations. As an affiliate, you can enable Bits and Cheering, which allows viewers to support your channel financially. Let’s explore how to set up donations as a Twitch Affiliate.
Twitch Affiliate/ Partner Explained
Before diving into the setup process, let’s quickly review what being a Twitch Affiliate means. Affiliates are streamers who have reached specific criteria, such as a minimum number of followers, stream hours, and viewer engagement. Twitch grants affiliate status to those who meet these requirements, offering them additional ways to monetize their content. Our comprehensive blog post lets you learn more about the differences between Twitch Affiliate and Partner.
Enabling Bits and Cheering
Bits are a virtual currency on Twitch that viewers can purchase and use to Cheer for their favorite streamers. A Cheer is a chat message that includes Bits, showing support for the streamer while offering viewers a fun and interactive experience. You can enable Bits and Cheering to receive donations when you reach affiliate status on Twitch. Here’s how:
- Log in to your Twitch account and go to the Creator Dashboard.
- On the left-hand side, click on Settings and then Affiliate.
- Under the Bits & Cheering section, click on the toggle switch to enable Cheering with Bits.
Once you’ve enabled Bits and Cheering, viewers can start purchasing Bits and using them to Cheer in your channel’s chat. Twitch pays you for the Bits used in Cheers, providing you with a source of income.
Remember that enabling Bits and Cheering is just the beginning. Creating engaging content, interacting with your audience, and providing a high-quality stream is crucial to maximizing donations. In the following sections, we’ll discuss other methods for setting up donations and ways to enhance your Twitch stream to attract more viewers and donations.
Setting Up Donations without Affiliate Status
If you haven’t reached Twitch Affiliate status yet, don’t worry—you can still accept donations from your viewers. There are alternative methods and third-party services that you can use to set up donations on Twitch without affiliate status. First, let’s explore some popular options for receiving donations from your supporters.
Discover Alternative Ways to Receive Donations
There’s no shortage of platforms and services that enable you to accept donations from your viewers, even without being a Twitch Affiliate. Here are some popular options to consider:
- Streamlabs: A go-to platform for many streamers, Streamlabs offers an array of tools, including a user-friendly donation system. You can create a custom donation page, set up donation alerts, and accept donations through various payment methods.
- StreamElements: Another well-regarded streaming platform, StreamElements comes packed with handy tools, including a donation feature. With StreamElements, you can establish a personalized donation page, receive tips via multiple payment methods, and showcase alerts on your stream.
- TipeeeStream: A donation platform designed specifically for live streamers that offers a customizable donation page, several payment options, and donation alerts to keep your viewers engaged.
- PayPal: A widely-used payment platform, PayPal allows you to create a custom donation page and receive donations directly from your viewers. Setting up a PayPal donation link or button on your Twitch channel is a popular choice for streamers looking to accept donations. We’ll dive deeper into using PayPal for Twitch donations later in the article.
Setting Up Donations with a Third-Party Service
If you decided to set up donations using a third-party service, Here is a simple step-by-step instruction to guide your way to giving your viewers a convenient way to support your stream.
- Sign up for an account: Choose a platform that suits your needs (e.g., Streamlabs, StreamElements, or TipeeeStream) and sign up for an account.
- Connect your Twitch account: Link your Twitch account to the platform to make sure everything runs smoothly.
- Customize your donation page: Follow the platform’s instructions to set up your donation page. You can usually personalize the look, add a description, and even establish donation goals.
- Select your payment methods: Choose your preferred payment options (e.g., PayPal, credit card, or cryptocurrency) so that your viewers have a variety of ways to show their support.
- Set up donation alerts (Optional): Follow the platform’s guide to enable donation alerts.
- Add a donation link: Use a Twitch donation panel with an eye-catching design and a clear call to action, encouraging viewers to support your stream.
By following these steps, you can easily set up donations on your Twitch channel without being an affiliate. Keep in mind that while third-party services provide great donation solutions, they might charge a small fee for their services. Make sure to review their terms and fees before committing to a platform.
Setting Up Donations with PayPal
PayPal is one of the most popular and widely used payment methods for Twitch donations. It’s secure, easy to set up, and offers a simple way for your viewers to support your channel financially. In this section, we’ll guide you through the process of setting up donations on Twitch using PayPal.
Benefits of Using PayPal for Twitch Donations
There are several reasons why many streamers choose PayPal for their donations:
- Security: PayPal offers a secure platform for both streamers and donors, protecting their financial information during transactions.
- Global Reach: PayPal is available in many countries, making it easy for viewers worldwide to donate to your channel.
- Flexible Payment Options: Viewers can use their PayPal account balance, credit card, or bank account to make donations.
- Low Fees: PayPal’s fees for receiving donations are generally lower compared to other payment methods.
Setting Up PayPal Donations on Twitch: A Step-by-Step Guide
Follow this step-by-step guide to set up PayPal donations on your Twitch channel and start accepting contributions from your viewers.
Step 1: Log in to PayPal
Log in to your PayPal account, preferably a business account, to keep your personal information private.
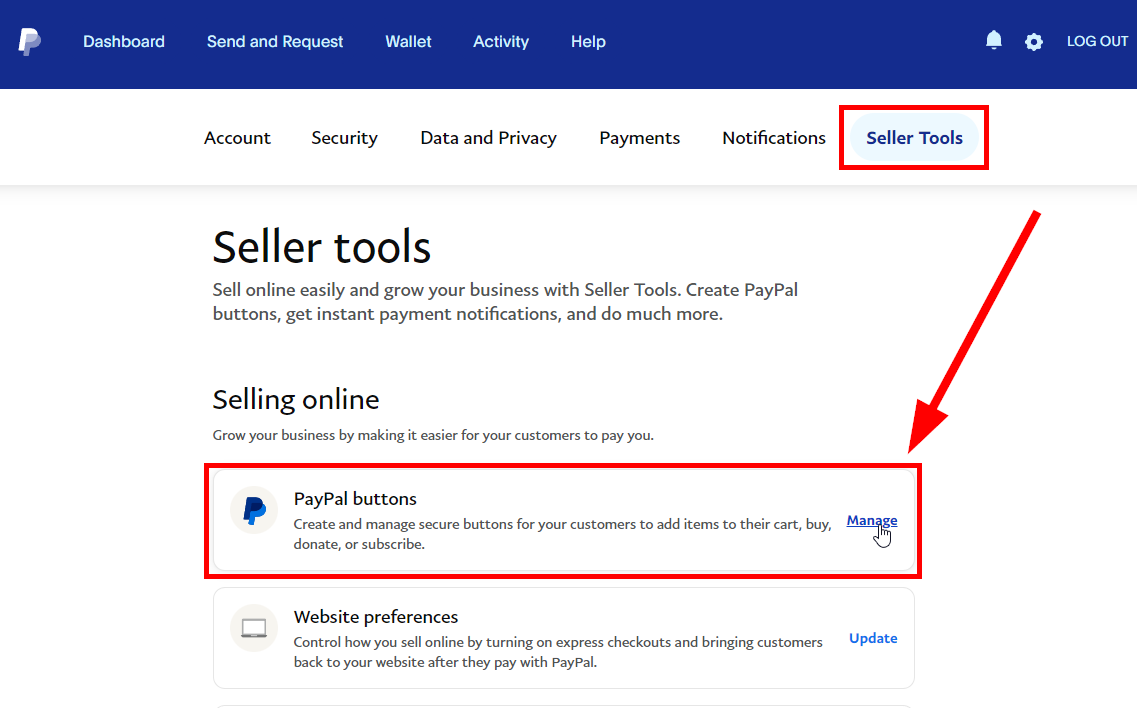
Step 2: Access the Seller Tools / Business Toolstab
Go to the “Seller Tools” tab or “Business Tools” tab (for business accounts) in the menu.

Step 3: Find the PayPal Buttons
Click on “PayPal Buttons,” and press the “Get Started” button.
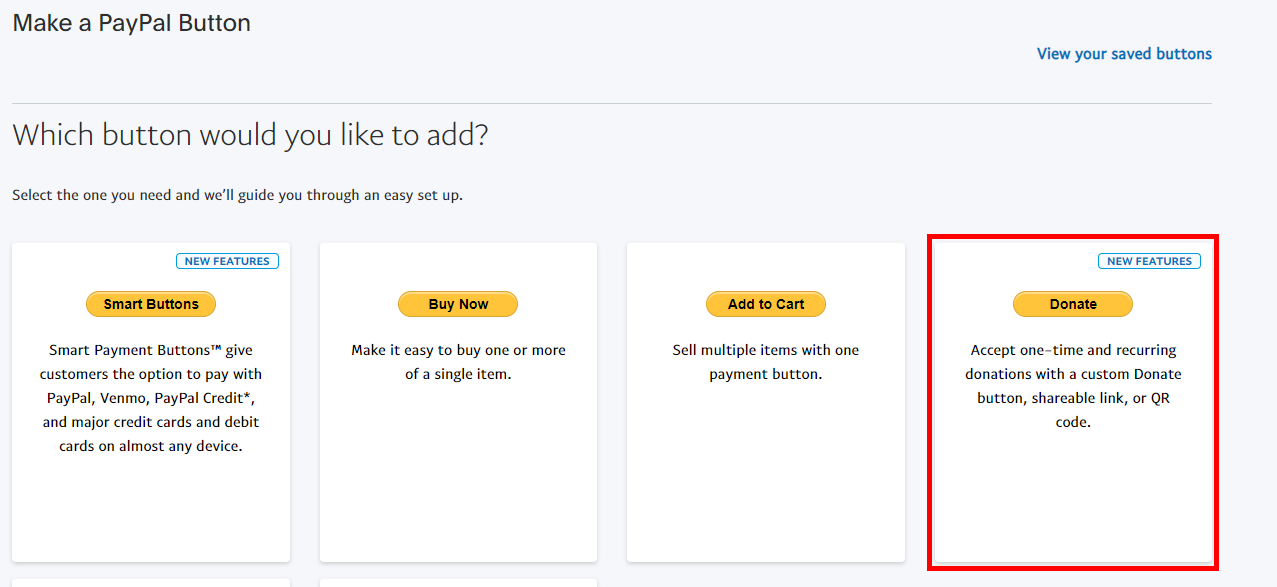
Step 4: Select Donate Button
Click on the “Donate” Button.
Step 5: Create a donation link
Choose the “Create a link” option and customize your donation page to finish.

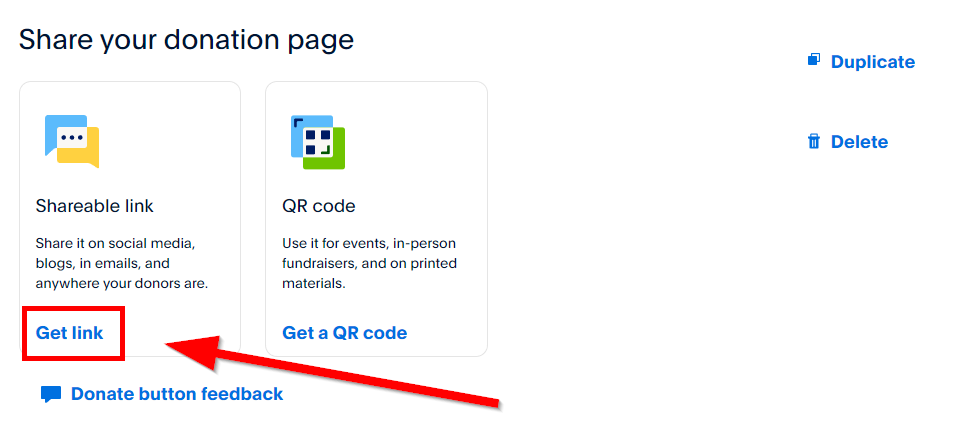
Step 6: Get the donation link
On the next page locate the “Share your donation page” section and click “Get link,” and copy the link.
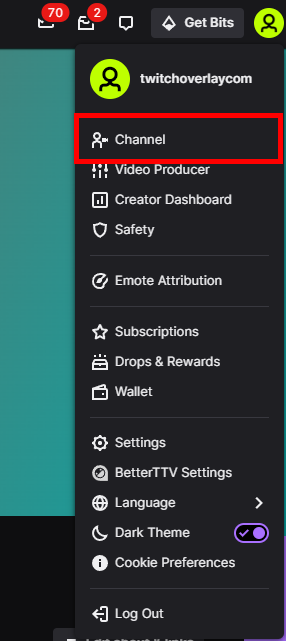
Step 7: Go to your Twitch channel
Visit Twitch.tv, click your profile picture in the top-right corner, and select “Channel” from the dropdown menu.
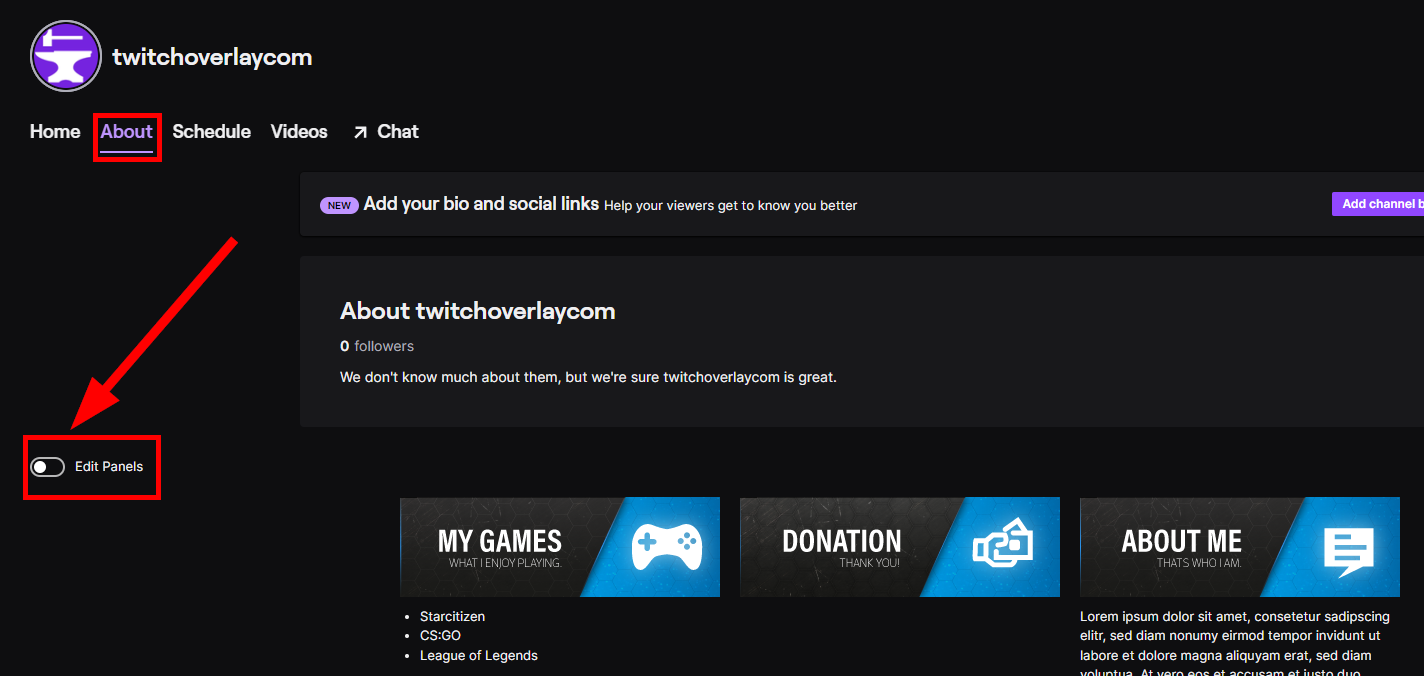
Step 8: Edit the About tab
Select the “About” tab and toggle the “Edit Panels” switch.
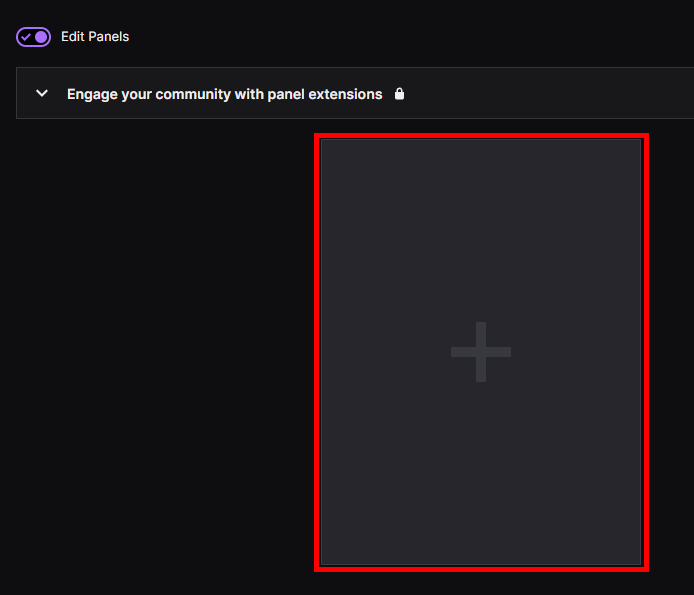
Step 9: Add a new panel
Click on the “+” area that appears.
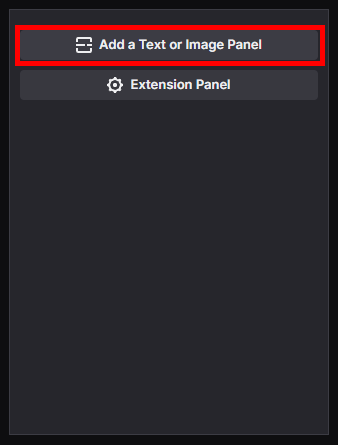
Step 10: Create a Text or Image Panel
Choose “Add a Text or Image Panel.”
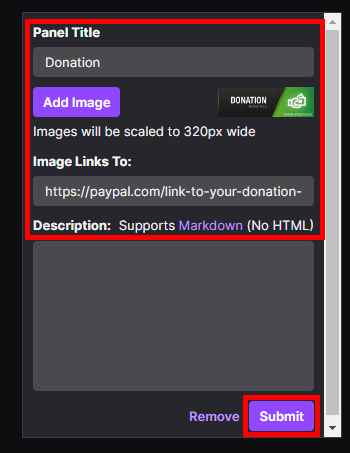
Step 11: Customize the panel
Write “Donation” in the panel title, upload a Twitch Donation panel image, and paste the link from Step 5 into the “Image Links To” text field. Add a description if you want, and don’t forget to click “Submit” when finished.
Step 12: Enjoy your new donation panel
Congratulations! You now have a working donation panel on your Twitch channel.
With PayPal donations set up, your viewers can now easily support your channel financially. However, setting up donations is only part of the equation. In the following sections, we’ll discuss setting up donations without PayPal and enhancing your Twitch stream to create an engaging experience that encourages viewers to donate.
Setting Up Donations without PayPal
While PayPal is a popular option for Twitch donations, not everyone wants to use it. Some viewers may prefer alternative payment methods or simply not have access to PayPal in their region. In this section, we’ll discuss how to set up donations on Twitch without PayPal, providing more options for your viewers to support your channel.
Alternative Payment Methods for Twitch Donations
There are various payment methods you can use to receive donations on Twitch without PayPal. Some popular alternatives include:
- Credit Cards: Many viewers prefer using their credit cards to make donations. You can set up a payment gateway like Stripe or Square to accept credit card donations directly.
- Cryptocurrencies: Cryptocurrencies are gaining popularity as a donation method. You can use a service like CoinPayments, BitPay, or Coinbase Commerce to accept cryptocurrency donations.
- Digital Wallets: Digital wallets like Skrill, Neteller, and Payoneer offer an alternative to PayPal for receiving donations. These services are available in many countries and provide a secure way to accept payments from your viewers.
- Local Payment Methods: Depending on your region, you can also offer local payment methods like bank transfers, mobile money, or regional payment gateways.
By offering multiple donation methods, you cater to a broader range of viewer preferences and increase the likelihood of receiving support. Setting up donations is just one aspect of a successful Twitch channel. In the next section, we’ll discuss enhancing your Twitch stream to create an engaging experience that encourages viewers to donate and support your content.
Tips for Enhancing Your Twitch Stream
Setting up donations is crucial for monetizing your Twitch channel, but it’s not the only factor contributing to your success. An engaging and professional-looking stream plays a significant role in attracting viewers and encouraging them to donate.
- Improve Your Stream Quality: Invest in a high-quality webcam, microphone, and lighting setup to ensure your stream looks and sounds professional. Check out our top 5 best Monitor recommendations and best microphone guide for more information on selecting the right equipment.
- Use Custom Overlays and Graphics: Custom overlays and graphics can make your stream stand out and give it a unique, polished look. Browse our best free Twitch overlays and top 5 stream packages to find the perfect design for your channel.
- Optimize Your Channel’s Branding: Consistent branding across your channel, social media, and other platforms helps establish your identity and makes your content more recognizable. Remember to use a visually appealing offline banner, starting soon screen, and intermission screen to maintain consistency.
- Create a Stream Schedule: A regular streaming schedule helps viewers know when to tune in, increasing your chances of building a loyal audience. Consistency is vital, so stick to your schedule as much as possible.
- Interact with Your Viewers: Engaging with your viewers during your stream is crucial for building a community and encouraging donations. Read and respond to chat messages, ask questions, and make your viewers feel valued. For more tips on viewer engagement, check out our viewer engagement guide.
- Use Social Media: Share info about your stream on Twitter, Facebook, and Instagram to reach a wider audience. Join relevant communities and engage with other streamers to build connections and increase your visibility.
- Set Donation Goals and Incentives: Create donation goals for specific upgrades, events, or milestones, and offer incentives for viewers to donate. For example, you can offer custom emotes, shoutouts, or exclusive content to donors.
- Learn from Successful Streamers: Watch popular streamers in your niche and analyze their streaming setup, content, and interaction with viewers. Learn from their strategies and adapt them to your own style.
By implementing these tips, you’ll create a more engaging Twitch stream that encourages viewers to donate and support your content. Remember, success on Twitch takes time and dedication, so keep refining your skills, experimenting with new ideas, and listening to feedback from your viewers.
Conclusion
In conclusion, setting up donations on Twitch is an essential aspect of streaming that can’t be overlooked. Whether you’re a Twitch Affiliate, Partner, or just starting out, providing your viewers with various options to show their support is crucial. With this guide, we’ve shown you how to set up donations using different methods like PayPal, Twitch Bits, and third-party services. Additionally, we explored some useful tips to help you grow your channel and make your streams even more engaging. So, now that you’re equipped with this valuable knowledge, it’s time to dive into the world of Twitch streaming, foster a supportive community, and turn your passion into something that can bring both joy and financial success. Happy streaming!


