Introduction on how to Twitch Stream on PS4
Broadcasting services have been experiencing a revolution by design over the past few years, not just in their specs but also in the fabric they were inherently made of. The distribution of content in the form of pre-recorded media has given way to the more authentic, user-engaging option of live streaming. As a result, Twitch has quickly risen to become the number-one streaming service for gamers worldwide. The availability of Twitch, once relying on third-party software and advanced knowledge thereof, has since broken free from its shackles, giving way to the convenient option to directly stream Twitch on PS4. So if you’re a veteran in console gaming, there’s no need to adjust to different setups to learn how to stream on PS4. Not only will you profit from the familiarity of a gamepad in your hands, but you also get the chance to participate in the vastly growing, up-and-coming PS4 section of the Twitch community. Read below to find out how to stream Twitch to PS4.
Requirements for PS4 Streaming
First things first, you’ll need the basics: a monitor, a controller, and a PS4. Whether you’ve got the standard PS4 or the souped-up PS4 Pro, you’re good to go. The Pro might give you a bit more oomph, but the streaming process is the same for both.
On the software front, make sure your PS4’s firmware is up-to-date. While that’s technically all you need, you’ll want to connect your PC or grab the Twitch app for Android/iOS to unlock some sweet features you won’t want to miss.
Now, let’s talk internet speed. ISPs love to boast about download rates, but upload speeds are the real deal for streaming. Aim for at least 5mbps for both, but if you can swing 25mbps or more on the upload side, you’ll be golden.
And hey, why not add some flair to your stream? There’s a whole world of professional streaming gear out there for every budget. Give some a whirl before you commit. As for webcams, the official Sony Playstation Camera is your one and only choice, making it a cinch to learn how to stream Twitch on PS4 with a camera. So gear up, and get ready to share your gaming prowess with the world!
The Proper PS4 Streaming Setup
Enable Twitch Broadcasting on your PS4
Correctly prepping your PS4 to stream on Twitch can be pretty overwhelming if you’re doing it for the first time. But if you stick to these basic steps, you’ll be live soon! And don’t worry, you won’t have to repeat these steps every time. Just this once, when initially learning how to stream on Twitch from PS4.
First, ensure your PS4 is working correctly and your controller is charged. Next, check if your internet connection is correctly established and works flawlessly without major upload or download drops. If you face issues, check your router’s backend settings and open all the necessary ports. This way, no security measures will stand in the way of your gaming and streaming experience. Also, remember that you can adjust your bitrate to determine how much bandwidth your PS4 can use. Once connected, ensure your PS4’s firmware is up to date. You’ll notice if that isn’t the case, as your PS4 will prevent you from accessing online services on outdated firmware. So if you’re online, you’re already good to go. After that, you can set up your headset and/or webcam if that applies to you. The process might differ depending on make and model, but it’s not rocket science either way.
So far, you should be able to check off the following steps:
- Plug-In your PS4 and start it up
- Charge your wireless controller or plug it in
- Ensure your internet connection is set up correctly
- Check your router’s backend, if necessary
- Adjust your bitrate to increase the amount of bandwidth to use
- Connect your PS4 to the internet via Wi-Fi or LAN
- Download the latest firmware for your PS4
- Connect your gaming headset and follow the instructions provided with the product
- Connect your Playstation Camera and go through the first setup
Connect your PS4 and Twitch Accounts
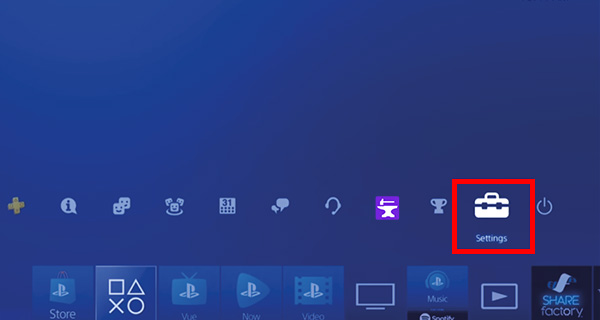
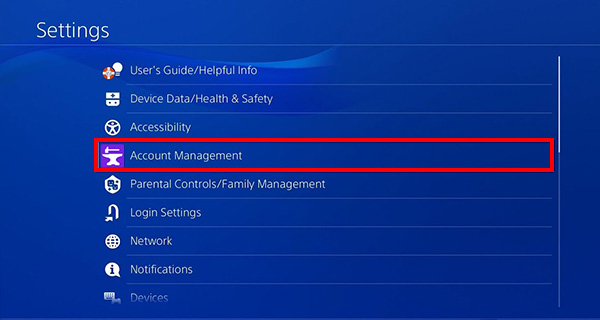
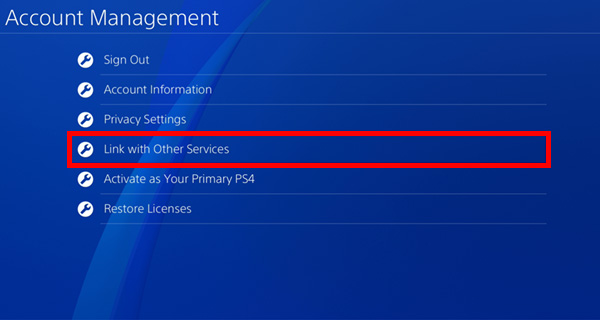
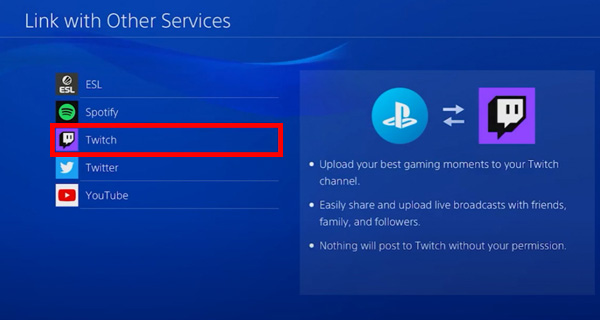
First, you must register a Twitch account on Twitch.tv. You can read about that in our Guide on How to Start Streaming on Twitch. After doing so, head to the main Settings on your console. Look for “Account Management”, followed by “Link with other services”, where the option “Twitch” will be available by default. A QR-Code and an activation code will pop up. If you have your phone nearby, scanning the QR-Code is the easiest way to proceed on how to stream from PS4 to Twitch. Alternatively, head over to Twitch.tv/activate and enter the activation code shown on your screen. Done, you’re connected! After that, we strongly recommend linking your PC/Laptop or downloading the Twitch app for Android/iOS. You’ll find countless features, which we’ll get into later. For now, follow up your checklist with the following:
- Create a Twitch account by visiting Twitch.tv and registering for a new account.
- Connect your PS4 and Twitch accounts by following these steps:
e. Scan the QR code displayed on your PS4 screen with your smartphone, or enter the activation code on Twitch.tv/activate using a web browser.
3 Log in to your Twitch account.
4 To access Twitch on your mobile device, download the Twitch app for Android or iOS. Alternatively, you can link your computer or laptop to your Twitch account by logging in through a web browser.
This part of the “How to stream Twitch on PS4” setup might seem a bit tedious, but it is essential to do this correctly. Furthermore, the setup ensures you’ll get all the features and options available. And last but not least, internet security is a big concern nowadays, so sticking to the necessary setup is an integral part of streaming PS4 on Twitch.
Configure Stream Settings for Optimal Quality
To broaden your audience and get your well-deserved viewership, you’ll want to ensure your stream’s quality is always on point. As mentioned before, internet speed plays a huge role in this. But a few settings are also available to ensure you are streaming in the best quality possible. What precisely that means largely depends on your setup. For example, the PS4 Slim is always locked to a maximum of 30 FPS, while the regular PS4 and PS4 Pro can run 60 FPS. Either way, always make sure to choose your stream settings accordingly. Don’t bottleneck your stream by locking it to 30 FPS when your console and internet can comfortably run 60 FPS. You’ll also find the option to adjust your stream resolution. While 1080p offers the best quality when you stream from PS4 on Twitch, it’ll be very demanding for your hardware and bandwidth. Generally, if it’s possible for you to stream in 1080p without lag, you should always choose this option. But it definitely won’t kill your career if 720p or even 540p is the best your system can handle. You will also notice the sub-options of “Standard” or “High” for each resolution, which is self-explanatory. If your system and internet are up for the task, always choose “High”. Depending on your game, there might also be settings for HDR, which is short for “High Dynamic Range” – a fancy way of saying “the colors look really awesome”. HDR will only work for some games; even if it does, only some viewers can experience HDR on their devices. But it looks really cool, so why not give it a try? You have now broadened your knowledge on how to stream Twitch on PS4 by the following steps:
- Improve internet connection and bandwidth usage if possible
- Set your stream quality
- Choose a resolution that is as high as possible without causing any lag
- Choose an FPS-Lock of 30 or 60, depending on your system
- Choose between “Standard” or “High” to alternate between general qualities
- Enable HDR where applicable
To summarize this part of the “How to stream Twitch on PS4”: The better the quality, the more hardware power and bandwidth you will need. Just play around with it, run a few test streams, and find whichever settings work best for you.
Broadcasting Your PS4 Gameplay on Twitch
Start your Twitch Stream on PS4
Now for the fun part! By now, you should’ve completed every necessary step to have successfully learned how to stream Twitch on PS4. What’s left to do is find a game you like, start it up, and press the “Share” button on your controller. This will bring up a small menu on the side of your screen, where you’ll select “Broadcast Gameplay” next. Here, you can choose between the available broadcasting services, like Twitch, which is the best choice for most people when streaming on PS4. You can enter a Title for your stream and a description. Below, you’ll find a few options to fine-tune the quality of your stream, and you’ll get the chance to directly share the link with your community. Once you’re all prepped up, hit “Start Broadcasting”, and you’re finally live! So to summarize:
- Start the game you want to stream to Twitch on PS4
- Press the “Share” Button on your controller
- Select “Broadcast Gameplay”
- Choose “Twitch” from the available broadcasting services
- Enter a Title for your stream
- Enter a description for your stream, if you want
- Select the quality settings (check the previous section of this, “How to stream Twitch on PS4”)
- Share the link with your community
- Select “Start Broadcasting”
Enhance your Stream with Overlays and Alerts
Overlays are to be understood as the graphical interface presented to your viewership. They’re available in a wide variety of shapes and styles, from sleek and nonchalant to bold and brave, with countless options for customization. An overlay could, for instance, contain your name or where to find you on other platforms. In addition, it could be set to dynamically interchange information with your game and display said info to your viewers based on parameters you can program yourself. You can find 100+ Free Overlays for your console stream in one of our latest articles or browse our Overlay Packages.
Whereas alerts are an effective way to engage with your audience without being too distracted from your gameplay. Overlays and Alerts work hand-in-hand, while the latter does just what the name suggests: it alerts your viewers to a specific event like a new subscription or donation. An alert can have many forms, the most common being pop-ups, like emojis or memes, and audible cues, like clapping or laughter.
To customize and seamlessly integrate your Overlays and Alerts for streaming Twitch on PS4, you don’t necessarily have to rely on third-party software. However, it can make the whole process a great deal easier. The vanilla way of doing so is by connecting your PS4 stream to your Twitch account on your PC or smartphone and customizing your overlays from there. Twitch offers a few basic designs to choose from. However, to get the most out of your Twitch Stream on PS4, you should consider software like Lightstream or OBS, which can genuinely unshackle the potential of your stream through fully customizable overlays and alerts.
This is also why letting your PC or smartphone join in on the fun was suggested earlier. The most popular software to enhance your Stream with Overlays and Alerts are:
While some options are available as smartphone apps, most are limited to PCs only.
Engaging with Twitch Viewers While Streaming on PS4
Respond to chat messages on Twitch.
For most consumers, the thrill behind a Twitch stream, as opposed to pre-recorded broadcasting, is directly engaging with their favorite content creators like you. It’s vital to keep your audience close and really let them join your Twitch stream. Your PS4 broadcast settings offer a small but important feature called “Comment to Speech” to help you with that. It does what it sounds like: It makes your system read the comments in the chat out loud to you. Suppose you prefer to engage with your audience via text. You can always grab your smartphone or laptop and write whatever you want. While this option slows down your gameplay, it’s the only way to access chat commands. Chat commands are short phrases you can use to manage your chat directly. The most important commands to interact with your viewers are:
- /mod {username} Grants mod rights to a user
- /unmod {username} Revokes mod rights from a user
- /vip{username} Grants VIP status to a user
- /unvip {username} Revokes VIP status from a user
- /poll Pops up a menu to create custom polls and let your viewers vote
- /endpoll Ends a poll
- /shoutout {username} Creates a button to have your viewers follow another user
There are many more commands for your Twitch stream on PS4, and it’s always a good idea to familiarize yourself with them.
Manage your Twitch Chat
To manage your Twitch chat, you should get used to multitasking. In addition to the commands you’ve already learned, there are a few more you’ll want to remember when managing your PS4 stream on Twitch:
- /pin {description} Pins a message to the chat board
- /announce {description} Highlights a message in the chat board
- /timeout {username} [seconds] Temporarily bans a user from your chat for the specified time (default = 10 minutes)
- /ban {username} Permanently bans a user from your chat
- /unban {username} Revokes a permanent ban
If you still need help managing your chat, tools are available to assist you with that. The first one is to use Twitch’s implemented rules feature. This enables you to define a set of rules that must be obeyed by everyone in the chat.
There’s also AutoMod, which is another vanilla feature for your Twitch PS4 stream. AutoMod is a little helper that automatically scans incoming chat messages for potentially inappropriate behavior and then notifies you or a mod to review that message.
Blocking Hyperlinks is another excellent way to subdue spam or potentially harmful messages in your chat. This makes Twitch auto-detect messages containing hyperlinks and stops them from being sent.
If you feel like spammers are gaining the upper hand, you can program a chat delay. This delays every incoming message by a set amount of seconds, so you have more time to respond to whatever grinds your gears.
Lastly, you can force email and phone verification if you want to be extra safe. This means that only users with a verified account can enter your chat. Not only does this significantly reduce the risk of spammers, but it also protects you from DDOS and other traffic-based attacks.
To summarize:
- Take your time to work out a set of rules that everyone must obey
- Enable AutoMod to automatically detect inappropriate messages
- Block Hyperlinks to stop people from spamming or even spreading viruses
- Use a chat delay to give yourself more time to react
- Force Email and phone verification to reduce multi-account spamming
Whew, pat yourself on the back – you’ve learned everything you need to successfully PS4 Streaming, from learning the basic requirements of setting up your PS4, connecting your accounts, configuring your stream, and enhancing it with overlays and alerts, to learning chat commands by heart. However… since Twitch is already a firmly established branch of the gaming community, there is one more rule you should never forget: Be different. Hundreds of people are already streaming PS4, playing the same games you play. So if you want to set yourself apart from the rest, give your audience something that’ll make them stay. Make them remember you and crave your streams when you are offline – and engage with them at any chance. So now, launch your favorite game, and kickstart your career in PS4 Streaming. You got this.


